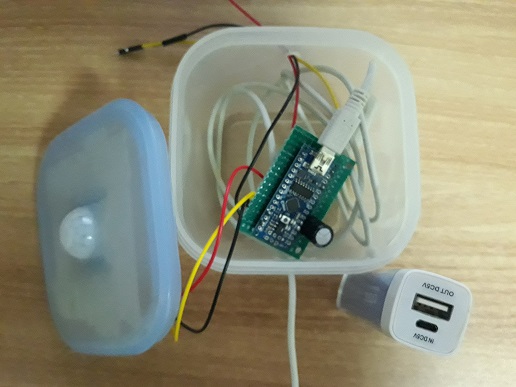
[아두이노] 양변기 자동 물내림 장치-2 절전 모드/저 전력 모드
- Download
- toilet.ino(2.5 KB) 2019-05-144
- Link
- http://blog.naver.com/twophase/22063731365654
 1. 개요
|
이전 양변기 자동 물내림 창치를 만들면서 가장 문제점이 되었던 부분이 전력문제였다. AAA(1.5V)건전지 4개로 아두이노 나노에 동작시키니 2일간 동작을 하였다. 이후 보드와 모듈에 전원을 분리하여 공급하려고 하였으나, 괜한 오기가 생겨서 기존 건전지로 최대한 오래 동작 시킬수 있는 방법에 대하서 찾아 보고 적용해 볼 예정이다.
기존 AAA건전지 대신 충전용 USB 배터리를 사용하여 테스트를 진행할 예정이다.
2. 아두이노 사용 전력 줄이기 |
아두이노 전력 소모 관련 내용을 정리한 사이트 참조
http://www.home-automation-community.com/arduino-low-power-how-to-run-atmega328p-for-a-year-on-coin-cell-battery/
| ATmega328P Pro Mini Version | PWR Source | State | 5.0 V @ 16 MHz | 3.3 V @ 8 MHz |
|---|---|---|---|---|
| Unmodified | RAW Pin | ACT | 19.9 mA | 4.74 mA |
| Unmodified | RAW Pin | PDS | 3.14 mA | 0.90 mA |
| No Power LED | RAW Pin | ACT | 16.9 mA | 3.90 mA |
| No Power LED | RAW Pin | PDS | 0.0232 mA* | 0.0541 mA* |
| No Power LED, no Regulator | VCC Pin | ACT | 12.7 mA | 3.58 mA |
| No Power LED, no Regulator | VCC Pin | PDS | 0.0058 mA | 0.0045 mA |
ACT - Active Mode
PDS - Dower-Down Sleep with Watchdog Timer enabled
* Here it is surprising that the 5 V version uses less current than the 3.3 V version. I cannot explain why, but the numbers were checked twice.
위의 내용을 정리해 보면 전력 소모를 줄이기 위하여 수면 모드와 보드 LED제거로 정리된다.
아두이노의 전력 소모를 줄이는 5가지 방법
https://www.makeuseof.com/tag/arduino-power-saving-tips/
1). Arduino Low-Power Software Libraries
Arduino의 전력 소비를 제어 할 수있는 여러 소프트웨어 라이브러리가 있습니다. 일정 시간 동안 Arduino를 깊이 잠들게하면 작동시 전원을 절약 할 수 있습니다. 이 기능은 기상 관측소와 같은 원격 지역에서 센서 판독 값을 얻거나 대형 장치의 서브 회로를 감지하는 마이크로 컨트롤러에 특히 유용합니다.
Github 사용자 rocketscream의 Low-Power library는 사용하기 쉬운 라이브러리의 예이며 일부 전력을 절약하는 데 적합합니다. 라이브러리의 예제 코드 중 일부를 기반으로 다음 코드입니다.
#include "LowPower.h"

// setup() your sensors/LEDs here

void loop()
{
  // This next line powers the arduino down for 8 seconds
  //ADC means analogue to digital conversion, and BOD for brown out detection
  //both are turned off during the sleep period to save power
  LowPower.powerDown(SLEEP_8S, ADC_OFF, BOD_OFF);

  //After each sleep, you can instruct the Arduino to carry out its tasks here - for example, take a temperature reading and send it to a server.
}
이 코드는 좋은 시작입니다. 이미 내장 된 방법을 사용하여 전력 소비를 줄이는 것뿐만 아니라 잠재적으로 값 비싼 analogue to digital conversion (유휴 상태에서도 전력을 사용할 수 있음) 및 입력 전압이 너무 높아지면 Arduino 실행 코드를 중단시키는 brown out detection 기능을 끕니다 낮은. Arduino가 얼마나 많은 힘을 줄이려고하는지 간단하면서도 효과적인 방법입니다. 우리는 이것보다 훨씬 더 깊게 갈 수 있습니다!
2). Arduino Built-In Power Saving
Arduino 프로그래밍 언어에는 절전 기능을 지원하도록 설계된 자체 내장 sleep기능이 있습니다. interrupt와 함께 사용되는 절전 기능으로 인해 Arduino는 다시 깨어납니다.
특정 핀을 interrupt로 설정하여 등록된 함수를 호출 할수 있습니다.
#define interruptPin 2

void setup()
{
  //interrupt pin MUST be Arduino pin 2 or 3 on Uno
  //set the pin to pull up mode
  pinMode(interruptPin, INPUT_PULLUP);
}
Now that this is set up as an interrupt pin, you can safely go about sending your Arduino to sleep. A simplified way of doing this is to create two small functions:
void sendToSleep()
{
  //enable sleeping - note this primes sleep, not starts it!
  sleep_enable();
  //attach the interrupt, specify the pin, the method to call on interrupt,
  //and the interrupt conditions, in this case when the pin is pulled low.
  attachInterrupt(interruptPin, wakeUpAgain, LOW);
  //actually activate sleep mode
  sleep_cpu();
  //code continues on from here after interrupt
  Serial.println("Just awoke.");
}

void wakeUpAgain()
{
  //stop sleep mode
  sleep_disable();
  //clear the interrupt
  detachInterrupt(interrputPin);
}
The code above is a simplified way to send your Arduino into sleep mode, and you can wake it up again by connecting pin 2 to the GND pin. While the Arduino Uno is in sleep mode it shaves around 11mA off the total power draw, and if you use a Pro Mini instead you can expect to drop from 25mA regular power usage to just 0.57mA.
Interrupts are a great way to bring your power consumption down, and The Kurks blog has some detailed posts about them, which help to demystify interrupts for beginners.
3). Slow Down the Arduino Clock Speed
The clock speed of your Arduino determines how many operations it can perform per second. Most Arduino boards run on a 8 or 16 MHz processor, though some of the offshoot boards such as the Teensy 3.6 boast processing speeds of up to 180MHz! This is why many DIY hackers like to use Teensy boards over Arduino in their DIY projects.
All of this processing power comes at a power cost, and for many use cases employing the full clock speed is overkill. This is where regulating the clock speed through software can make a difference.
It would be remiss of me not to warn you, changing the clock speed can cause bootloader issues and may leave you with an Arduino you cannot upload sketches to, if done incorrectly.
If you do want to try changing your clock speed, along with making tools in the Arduino IDE to allow you to change CPU frequency on the fly, Pieter P’s detailed guide can help you get started.
4). Replace Power-Hungry Arduino Components
The Arduino Uno is the most popular board for beginners, and most Arduino kits supply either an official or clone model. Its larger form factor and hot swappable microchips make it perfect for experimentation, and its broad capacity for input voltages along with onboard voltage conversion for 3.3v components make it fit for almost every purpose.
All of this functionality doesn’t come cheap in terms of power usage. With this in mind, there are a number of things you can do to physically alter an Arduino Uno to save power.
The voltage regulator on the Arduino Uno causes the largest single power drain on the board. This isn’t particularly surprising, as it has to drop up to 7v safely from the input power supply to the board itself. Some have tried to get around this by replacing the regulator with more efficient ones, but this doesn’t really solve the issue.
Patrick Fenner of DefProc engineering came up with a great solution in his blog postcovering Uno power saving strategies. By replacing the voltage regulator entirely with a DC-DC buck converter, he managed to half the power consumption of the microcontroller.
5). Make Your Own Arduino
A sure-fire way to only use the power needed for your project is to design a microcontroller to your own specifications. In the past we’ve shown how you can build your own Arduino for a fraction of the cost of an official board.
As well as having much more control over the size and scope of your circuit, this can bring power consumption down to 15.15mA in standby, and as little as 0.36mA in sleep mode. These figures are taken from the incredibly detailed post by Nick Gammon on his forum.
This post covers many other aspects of Arduino power saving, and is a fantastic resource to refer to when trying to squeeze a little more time out of a mobile power supply.
Use Arduino for Big Ideas and a Small Power Footprint
When you are working on your first beginner Arduino projects, power consumption probably isn’t too much of a concern.
As your ideas get bigger and require more thought, it is well worth learning ways to streamline your set up. Between making sure you get the right Arduino board and setting it up to get the most out of it, you can go a long way to making truly unique and useful devices. Good luck and keep tinkering!
3. 아두이노 수면 모드 |
네이버 블로그 새다리님 자료를 참조하여 (2번째 방식) 아두이노 기본 sleep Mode구현 하였다.
처음으로 아두이노의 인터럽트를 구현해 보았으며 인터럽트 핸들러 동작 함수가 인터럽트 모드여서 delay 함수가 동작하지 않는 등 기존 함수의 실행에 문제가 판단되어 flag를 남기는 방식으로 하여 Main Loop에서 제어 하도록 하였다.
아직 인터럽트 모드에 대한 정보가 부족하여 경험치가 올라가면 내용을 공유 하도록 하겠다.
//******************************************************************** // Program : Control Toilet // Auther : Duke Kim // Copyright : Hell Maker (2019) //******************************************************************** #include <Servo.h> #include <avr/sleep.h> #define SWITCH_PIN 2 #define SERVO_PIN 9 //-------------------------------------------------------------------- // Global //-------------------------------------------------------------------- Servo ServoMoter; bool g_bExec = false; //******************************************************************** // Setup //******************************************************************** void setup() {
Serial.begin(9600); pinMode(SWITCH_PIN, INPUT);
ServoMoter.attach( SERVO_PIN ); ServoMoter.write( 0 ); Serial.print("Start ...\n") ;
delay(1000); } //******************************************************************** // //******************************************************************** void loop() { // lowest power consumption mode set_sleep_mode(SLEEP_MODE_PWR_DOWN); // Attach interrupt at pin D2 (int 0 is at pin D2 for nano, UNO) attachInterrupt(digitalPinToInterrupt(2), wakeUp, RISING ); // enable the sleep mode function sleep_enable(); // disable the ADC ADCSRA = 0; //to disable the Brown Out Detector (BOD) before going to sleep. sleep_bod_disable(); // calls function to put arduino in sleep mode sleep_cpu(); // when interrupt is received, sleep mode is disabled and program execution resumes from here sleep_disable(); // we detach interrupt from pin D2, to avoid further interrupts until our ISR is finished detachInterrupt(digitalPinToInterrupt(2)); // // Action // if( g_bExec ) { g_bExec = false; Serial.print("Switch On\n") ; ServoMoter.write( 150 );
delay(5000); ServoMoter.write( 0 );
delay(5000); Serial.print("Switch Off\n"); } } //******************************************************************** // //******************************************************************** void wakeUp() { g_bExec = true; } |
현재 아두이노의 Sleep Mode를 구현 적용하였으며 다른 H/W적인 조치 후 내용을 공개하도록 하겠다.